By Andy Woodward
Whilst CT scanners can measure parts and assemblies made from most manufacturing process and materials, they are actually the perfect companion to 3D printers.
By nature, 3D printers can produce intricate parts and it matters not if that intricacy is on the inside of a part or on the outside.
If the detail is on the inside then all other non-destructive testing methods such as coordinate measuring machines, laser scanners and white light scanners are made redundant and CT scanning becomes the only way to inspect these intricate 3D printed parts.
Another development in the use of 3D printed parts is that in the past they may have been limited to the product development phase, this is no longer the case manufacturers are now printing many production parts in 3D printers.
When printing 3D production parts the need for a CT Scanner is even greater since traceable inspection with a known measuring uncertainty becomes very important.
We’ll be highlighting 3D Printer technology and CT Scanning at our Open House, Metrology Matters Live next week, but I thought it would be a good time to review why CT inspection could easily be the right thing to protect your business and save you money.
CT Scans…not just for doctors anymore. Modern CT machines give engineers “X-Ray Vision
Computed Tomography or CT, as it’s commonly known, has been used in the medical field for years, but its use in industry has lagged far behind.
Medical CT machines take multiple x-ray slices through human bodies so doctors can get a complete 3D image of the interior of the body. The completeness and the clarity of information available to doctors today with CT scanning is amazing compared to just looking from the outside or using exploratory and invasive probing. Even X-rays have no comparison to what is possible with a CT scan.
Industrial Computed Tomography machines offer the same leap forward in engineering and manufacturing. It offers engineers a 3D interior and exterior view any component or complex assembly.
One important difference between the medical and Industrial CT machines, like those produced by Wenzel America, is that we use software and computers to add a much higher degree of dimensional accuracy to the images.
A modern CT machine can look inside the part with absolute accuracy. The data set returned to the engineer is invaluable and can’t be duplicated with any other evaluation or measuring method. It’s like seeing into the DNA. He or she can look inside the part, manipulate it and even “remove” and look at discreet components of different densities. No other coordinate measurement or testing method can do this.
So, why aren’t more in industry adopting it? Why aren’t you using it?
I can only think of two reasons you would not to be using CT for industrial applications, either you don’t know enough about it or you think it costs too much. After reading this article either reason will no longer be valid.
Reason #1 – Lack of awareness of what CT measuring technology can do for your engineering and manufacturing processes.
Many engineers don’t realize what they can do with a Computed Tomography system. It’s a matter of lack of information and not knowing there is better option available to get ALL the data they need – without compromise.
• A modern CT system can measure an entire part inside and out.
• What happens when your “part” is a complex electronic assembly like a key of or remote control?
• How do you figure out what’s wrong, if the inspection process requires you to disassemble it?
• How can you isolate a bad connector that way?
You can’t. Not without a CT machine, that is.
• A modern CT system can measure assemblies from the inside out and see why they don’t work – without contact and without disassembly or destruction.
• It can see multi-material assemblies and isolate the individual components. Pieces with different densities can be viewed separately and analyzed as discreet 3D objects or as the whole part.
• It can even analyze the material flow in plastic and composite parts, so you can identify bonding issues or inconsistent materials.

Coordinate measurement
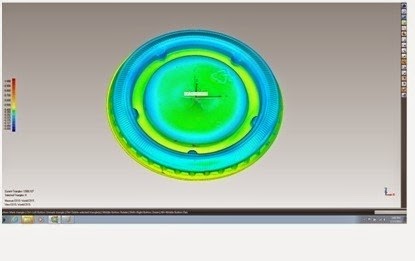
View showing a wall thickness analysis of a fountain cup lid. This is vital to plastics molders to ensure that they meet the product specification with the minimum amount of material used.
Reason #2 -CT machines are expensive or unaffordable. I would challenge that the real truth is modern manufacturers can’t afford to NOT have a CT machine.
Mistakes are expensive. Endless part iterations are expensive. Recalls because of undetected defects are expensive.
There are three words I am going to highlight that have everything to do with why you can’t afford NOT to get a CT Machine or at least outsource the use of one. They are: Compromises – Liability – Reputation.
Compromises
How many do you make due to lack of time and technology?
Throughout the history of industrial coordinate measurement, quality and R&D engineers have had to compromise and make decisions on what they should measure based on the technology and time they have had available to them.
They have asked, “What are the dimensions that I believe to be critical?”
“What do I think (because I can’t actually see inside) is wrong with my component or complex assembly?”
“What is my best guess as to why doesn’t it work?”

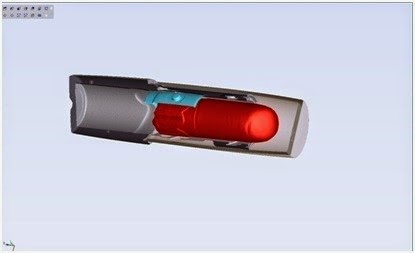
View showing how a different materials in an assembly (a lipstick in this case) can be isolated, enabling a full analysis of how the mechanisms interact. View showing how a different materials in an assembly (a lipstick in this case) can be isolated, enabling a full analysis of how the mechanisms interact.
With CT measuring machines you can capture the complete part (the shape and dimensions, the density, the material flow, any porosity, cracks or inclusions). This data is stored in “Voxels” (like 4D pixels.)
At Wenzel America, we call this the “Part DNA” – It is everything the part is, it’s everything that defines the part itself and the entire finished assembly.
When engineers have the Part DNA, they can do everything they need to do – now or later – inspection, NDT, archiving, reverse engineering and investigation.
If you have taken the time, effort and money to develop a significant product, such as a new smart phone, the cost to keep its “DNA” on file is insignificant compared to the potential benefits.
The engineer also has the option to store this Product’s DNA for later measurement or for full archiving of everything to do with the part for future ‘protection’ of the supplier.
And on the time side of the ledger, more advanced CT machines can do the measuring and evaluation twice as fast as typical CMM contact measuring machines used for the same application.
Liability
Think about it. A 37-cent part failure can cost you millions or billions.
Often the parts measured by CT machines have quite low value in themselves, but failure of such parts in the field can lead to disastrous effects, particularly where human safety is an issue. Whether the parts are for aircraft or automobiles, medical devices or electrical equipment and connectors their reliability is measured in terms of life and death.
Even simpler consumer products that sell in the millions can fail with equally expensive effects on company reputation or due to recalls.
With a CT machine you can archive the Product DNA of any part which allows them to be re-analyzed individually in the event of a field failure. This provides the ability for rapid correction or even defense against a potential lawsuit.
Expert investigators can also use CT data to prevent counterfeiting of copyrighted or patented products which also again reduces liability and retains profits. In fact, the “Part DNA” generated by the CT system can be made part of the patent.
Potential users of CT data should ask themselves this question:
“What is the cost of not using CT data to make sure I have no future liability?”
The answer could easily dwarf the price of a CT machine or at the very least lead to the use of a CT bureau service to start compiling Part DNA data files.
Reputation
The final word for any company – a bad reputation can cost everything.
What is the cost of a recall to a car company because something doesn’t work?
What is the cost of loss of market share to a medical device manufacturer if the device doesn’t function properly?
How much will a failed application device cost an antiperspirant manufacturer?
Besides potential lawsuits, the loss in reputation and market share could be a financial disaster.
Industrial Computed Tomography is not completely new, but the adoption rate for manufacturers is slower than it should be, especially considering its DNA. Computed Tomography is practically made for industrial application. The faster it is put to use the more advances we will make and the higher and more consistent all out manufacturing will become.
Getting started with CT coordinate measurement may appear expensive, the real expense is not using the technology and what the lack of needed precision data is costing all industry. Integrating a CT machine into your testing and engineering processes is an investment that can pay for itself in days, not years.
More than 20,000 medical CT scanners are in use in the United States and they have revolutionized patient care and diagnosis. They give doctors the data they need to save lives, not having one is no longer an option for any reputable healthcare system.
The same case can be made for manufacturing and industry.
How much is not knowing your “Part DNA” costing you?
Full adoption of Industrial CT systems is no longer a luxury and it is something no company can afford to ignore.
About the Author – Andy Woodward is President of Wenzel America Ltd., a wholly-owned subsidiary of Wenzel Group of Germany. The company sells and supports the full range of Wenzel products including range of industrial CT scanners produced by Wenzel Volumetrik. The exaCT brand CT systems, offer a range of machines from all the way from entry level bench-top systems to more powerful models capable of scanning multi-material assemblies and aluminum castings. Wenzel America offers one free exaCT analysis and live consultation on results for any new or existing industrial client wanting to see CT in action.
